Thursday 17 January 2013

Rudolph the Red Nosed Reindeer

Posted by MyHappyFinger at Thursday, January 17, 2013 0 comments
Hi all lovely fingers! I wanted to introduce to you my new family member, Rudolph.


Yeah........I know....... it's super late to show it now especially when Christmas is over long long time ago....but isn't he cute?? =^o^= (trying to escape from explaining why it's late to post)


The side face of Rudolph (Spam more picture to distract you). Rudolph is actually made with sock and felt if you were wondering. Fun to make and easy to do!


Yup! Duffy hanging on his antler LOL. I don't have a Christmas tree, so this is what I did :P


At least Rudolph wont be lonely on Christmas with Duffy and ShellieMay :P .By the way, Rudolph was born on Christmas 2012!

Friday 7 December 2012

Duffy & ShellieMay Christmas Ornament Pattern

Posted by MyHappyFinger at Friday, December 07, 2012 0 comments
Hi all lovely fingers! Christmas is coming very soon. Have you decorate your Christmas Tree? How about adding little Duffy and ShellieMay on it?


This is a little present from me to you........But you have to make it your own! Haha! Download the pattern here.

Things that you need before you start:

1) Scissor
2) Felts : For Duffy (light brown, dark brown, beige, black, pink, red and white)
              For ShellieMay (light pink, blue, beige, grey, pink, red and white)
3) White color ribbon and any color ribbon for the ornament loop
4) Polyfil
5) Embroidery thread
6) Fabric glue
7) Water soluble marker
8) and your fingers :)

Ok, let's start happy fingers!


Cut out the felt according to the pattern. I'm doing ShellieMay here.


Match 2 pieces of ears together. Following the purple line i drew in the picture, join the ears using whip stitch/blanket stitch. I am using matching color thread so it look less visible.


Stuff the ear with some polyfil using a sharp tool. Repeat the same process for the other ear so you complete 1 pair of ear.


Position the Mickey Mouse shape on 1 piece of the face. Secure them with a pin.


Using whip stitch, applique the mickey shape on to the face.


Glue the nose and mouth onto the muzzle using fabric glue.


Draw the shape of ShellieMay mouth using water soluble pen.


Embroider the shape of the mouth you drew earlier.


Position the muzzle on the mickey mouse shape as shown. Following the purple line i drew here, start stitching (blanket stitch/whip stitch) at the muzzle with your beige thread.


Stuff in polyfil and stitch opening closed.


This is how it looks like. You will have a slightly 3D effect on the muzzle. LOL


Cut 15cm ribbon of your choice for the ornament loop. Fold half and secure it with a pin on the back of the head.


Stitch them together as shown.


With the help of the pattern, arrange all the parts accordingly (clockwise). Secure the parts with pin if you want and start stitching from the bottom of the head stopping about an inch before you reach the other side of the head. Stuff with polyfil and continue stitching the opening closed.

NOTE: You may notice here the eyes are completed. I am so sorry that i forgotten to snap the picture of the eyes part! So so so sorry.....but if you remember the nose and mouth part, this is exactly the same technique that i use. I glue the blue color eyes and add a little white color dot on it to make it look more lively. Then, i embroider ShellieMay eyelashes with grey color thread. 


Time for the ribbon part! Cut red color felt according to the pattern. Prepare white color ribbon for this, preferable 3mm width.


Fold the red felt like shown and secure it with the white ribbon.


Stitch the ribbon on SherlieMay's head and you are done! Duffy are done using the same technique minus the eyelashes!

I hope your fingers enjoy doing this like how my finger feel. 

Happy Sewing!

Monday 10 September 2012

Wools Material Update

Posted by MyHappyFinger at Monday, September 10, 2012 0 comments
This is a short short update on the materials i received after a long long wait.


Some colours are different from what i expected. But it's OK...because i got the colour combination that i wanted.

It's the Shellie May's colour combination! Although colours are not 100% matches exactly like Shellie May's but this is the nearest colour that i can find. I hope the end product looks OK. Wish me luck!

That's all for today. Bye!

Friday 31 August 2012

When Little Pullip Marilyn meet Obitsu

Posted by MyHappyFinger at Friday, August 31, 2012 4 comments
Today i am going to talk about my doll on how i switch her body type. I was inspire with the Little Pullip hybrid pictures posted at flickr. It was so coincidence that i have the same Little Pullip!

Warning, this page may have doll nudity and violent (according to my bf because he thinks it is cruel). Skip this page if you do not wish to see them.


The victim (according to my bf...)


Victim and her new body
I'm not sure if this is a tutorial because my purpose is to show you what my fingers did today. You may take it as a reference, but do it at your own risk.


Things that are needed for the transformation:

1) Little Pullip
2) Obitsu 23cm Body (white)
3) Some transparent elastic bands
4) Screwdrivers (slotted head and cross slot) Go google it.


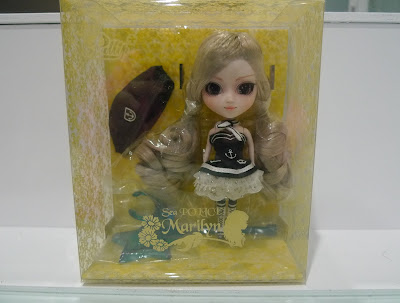
I don't know about you, but i am very very bad at deboxing pullip doll. I spent more 30 minutes to debox her, and still i mess up >.<


Anyway, this is how Little Pullip Sea Police Marilyn Doll look like. As you can see, she is tiny.


Begin with the back of the head, put the slotted head screwdriver underneath the wig and then slowly pry off the wig.

You can try pulling it off (my favourite part!) but slowly and carefully...only when the wig is loose enough. 


I do it until it reach the opening gap for the head. I did not remove the whole wig off her head because i am lazy to glue them back after done and i do not wish to change her current wig. If you want to change her wig with different one, just remove the whole wig off her head.


When i come to this point..i was like shyt! I totally forgot about this hidden cross slot screw and I did not prepare the cross slot head screwdriver! As you can see from my previous picture, i only show 1 screwdriver.

Anyway, just pretend this is a cross slot head screwdriver (yes i forcefully remove the cross slot screw with a slotted head screwdriver and it work! hahaha! ). Remove the screw at the back. Just in case you don't know like me, turn anti-clockwise for removing, clockwise for installing.


After unscrew, remove the back part of head and......shyt...another 3 cross head screws hidden inside....


Again, pretend this is the correct screwdriver and remove the 2 screws at the bottom. Do not remove the one on top.


The body should be able to remove now. You do not need to screw them back.

Before and after elastic bands
Tie elastic bands around the neck of Obitsu body. I need few of them to achieve the thickness.


Place the Obitsu body to the head like this and close back the head.

I make sure there is no gap between the head before i screw them back. 

 
Try shaking her lightly by holding her chest, if there are sound from the head, unscrew and add more elastic band. Make sure the head is moveable to left and right too.


Once everything's done, pull down the hair and....
.
.
.
.
.
.
.
.
.
.
.
.
.
.
.
.
.
.
.
.


 Viola!


Obitsu body is very pose-able!

Please take note that this reference are only applicable for the newer version of Little Pullip.

Hope you enjoy this post!

Monday 20 August 2012

Duffy & ShellieMay Felt Keychain

Posted by MyHappyFinger at Monday, August 20, 2012 0 comments
I bought plenty of pastel colour felts during shopping with my bestie last month so i decided to make keychain with them.

Fist attempt.
My first attempt doing ShellieMay. Uh...I think she look more like a koala bear instead. >.< and thus i decided to redo.

Second attempt (left).

My second attempt, i think she looks much better and pretty satisfy with it :) I also added in ShellieMay's ribbon!


Bright Brown Duffy on left.

Darker Brown Duffy on top.

Which Duffy to pick?hmm...

Do they look cute? I tested two different colour for Duffy. I personally prefer the brighter colour one but decided to go for the darker brown colour because it matches Duffy's original colour.


 After finalizing everything, time to copy and paste :)


My Happy Finger Template by Ipietoon Blogger Template | Gift Idea